Measuring Lens Field of View (FOV)
(aka: Locating the Lens Entrance Pupil)
Next Article >>
The Challenge: If you know a lot of information about a particular camera
and lens, calculating the rated lens field of view is very straightforward. However, can we
measure actual lens field of view with NO prior knowledge about a particular camera
and lens (and in the process find the lens entrance pupil location)?
The huge problem: Modern lenses are complicated. Where do you measure to on the
camera/lens to determine lens angle? To the front of a lens? To somewhere in the
middle of the lens? To the film plane? Where?
Simplistically, you would just use the well known formulas (below right), to compute the
lens FOV. But doing so requires you to first know the location of the Entrance Pupil
for your lens, which you do not know (and it changes depending upon various factors)!
Warning: Since field of view for a lens changes depending upon
(a) the DSLR used, (b) the focal length, (c) focus distance, (d) etc, you must
first decide what focal length and focus distance to test
(and lock those values for the test below). For panorama
photography, it is useful to use
Hyperfocal Distance.
After focusing on an object at a particular
distance, you must turn your camera to manual focus to 'lock in'
that focus distance for this entire test.
It is a little known fact that telephoto lenses can have a radically
different actual focal length depending upon focus distance (Google
'focus breathing' for more info). For example, a Nikon AF-S 28-300mm
f/3.5-5.6G ED VR lens set to 300mm will have the expected actual focal
length near to 300mm when focused very far away (near infinity) -- but has an
actual focal length less than half that when focused at 18 inches!
|
|
FOV Measurement Setup
x = DistanceFromWall
y = WallDistance/2
α = FOV° / 2
α = tan-1(y/x)
x = y / tan(α)
y = tan(α) * x
FOV° = 2 * tan-1(y/x)
| |
|
|
|
The clever solution: We can measure lens FOV and compute where
the Entrance Pupil of the lens is, all in a single step, by taking two
sets of accurate lens measurements.
The Measurements:
Accurately measuring lens FOV requires the setup like you see to the right.
It requires two separate sets of accurate measurements -- one with a near 'x' (camera close to wall)
and another with a far 'x' (camera further away from wall).
So, repeat the following steps twice. (1) One time with the camera close to the wall (like 3 feet).
(2) And another with the camera farther away from the wall (like 8 feet or more):
- Place your tripod in a large room, level and centered facing a wall (and perfectly square with
the wall). Take note of the height 'h' to the center of the lens.
- Print out two registration grids and tape them to the wall with the
center of the grid at exactly the same height 'h' as your lens. Adjust the left/right of the grids
by looking in your camera viewfinder attempting to see just the very edge of the grid.
- Take a test digital photo and examine the image. The registration grids must be perfectly centered
vertically on the left and right sides of the image (like the 'dotted outline photo on the wall
in the setup example). If not, your tripod was not perfectly level -- 'h' for the two grids was different.
Adjust your tripod and repeat until level.
- Take a digital photo and closely examine where in each grid the digital picture edge is located. Do
this on a computer by zooming into the image. Mark a red spot representing the photo edge on each
grid on the wall.
- Note that the distance from both red points on the grids to the common lens point (front/center is best; see below)
must be the same
distance. If not, your tripod was not 'square' with the wall. Adjust the tripod and try again.
- The distance between the two red dots on the wall is the "WallDistance".
- The distance from the wall the any common point on the lens/camera (front of lens;
film plane mark on camera, etc) is the "DistanceFromWall".
TIP: Since it does not matter, it is often easiest to simply measure to the
front/center of the lens.
How it all works: The angular origin for the lens is somewhere in the lens system,
and the surprising thing is, we actually don't have to know where! Instead, take two
measurements to a common single point on the lens/camera (one near, one far). This common
point is NOT the angular origin of the lens. However, because the lens FOV angle is constant
for the two measurements (see warning about locking focus above),
the 'tan(y/x)' to the true angular origin of the lens must be the same/equal for
both 'near' and 'far' measurements.
This means there must be some unknown constant distance 'k' from the common measurement point
to the true angular origin! And once we know 'k', we can calculate the true lens FOV using
the well known forumlas.
Namely:
tan(near-measurement) = tan(far-measurement)
or more specifically (refer to formulas above right):
where 'k' is the unknown distance. But with two measurements, we can actually
rearrange this equation and solve for 'k'. Doing so, we get:
|
Entrance Pupil: 'k' is also the offset from the common measurement point
to the location of the Entrance Pupil for your lens, also known as the
Panorama Pivot Point.
|
|
The final FOV:
After finding 'k', adjust both near/far 'x' (Distance From Wall) values by this 'k' amount and use the formulas above
to solve for the final FOV°.
Here is a script that does all of that computation for you:
To assist in understanding how this works, clicking on one of these
links will fill in the table above with actual test data:
Warning: Please note the even being off by 1/16th of an inch in your measurements will
throw off the results a little. The results will only as accurate (or not) as the
original measured data.
Measure FOV at the Mall: Really super size things!
Go to the local mall and find a wall that
is fairly 'in-line'. Take a picture, similar to the image below, where on each left/right side of the image
you have windows to help you pinpoint exact edges. Remember to be 'square' with the mall wall (in my case,
I just used the parking lot grid to help, which appeared fairly 'square' with the mall).
Then simply count walking paces. Remember to start counting paces from directly under the camera lens.
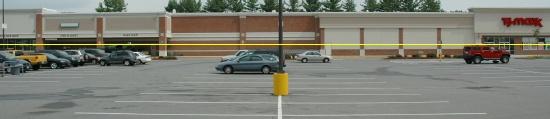
Mall image (with top/bottom cropped) with vertical FOV center line
In my case, I was 81 paces from the mall, and the mall wall distance was
109 paces. Plugging these figures into the FOV formula above results in a FOV
measurement of 67.87°. Remarkably close to the 67.66° calculated above
considering the measuring tape is 'walking paces' and that the test was performed
in about five minutes!
Optional: Take a friend and a 100-foot measuring tape with you and instead of counting
paces, actually measure distances to the nearest inch. The resulting FOV measurement will be about as
precise as you could ever get.
This all works because you are making the unknown 'k' inconsequentially small.
|
